In some form or another, I have been a systems adminstrator for various Jenkins instances for over eight years. While I wish I could say that has imparted some deep, hard-earned, wisdom upon me, truthfully, it’s been about the same as managing any other application: a constant battle of system dependencies, monitoring challenges and upgrades.
The most notorious instance I manage is run by, and for, the
Jenkins project itself, located at
ci.jenkins.io. Up until last
Friday, ci.jenkins.io
had been operating via the project’s Debian packages on Ubuntu 14.04 LTS with
the openjdk-7-jre package providing the Java system dependency.
A fairly common setup.
Except we started to
see
PermGen errors which started to take the service offline every other week.
We engaged in a fairly common discussion as a result. Playing the part of
Operator I suggested tweaking various JVM settings or investigating a possible
memory leak. Another contributor, playing the part of Developer, suggested pulling the
rip-cord and upgrading to OpenJDK 8.
A little one-act-play I have participated in for every single JVM-based application I have managed since OpenJDK 8 came out. A classic!
Fellow Jenkins administrator, Dean Yu, then joined the discussion with data:
Java 8 + G1GC solved a ton of problems we had compared to Java 7 + CMS. Java 8 is much better at cleaning non-heap memory than Java 7 was at cleaning PermGen. I’m attaching a graph of our instance to show the difference between 7 and 8.
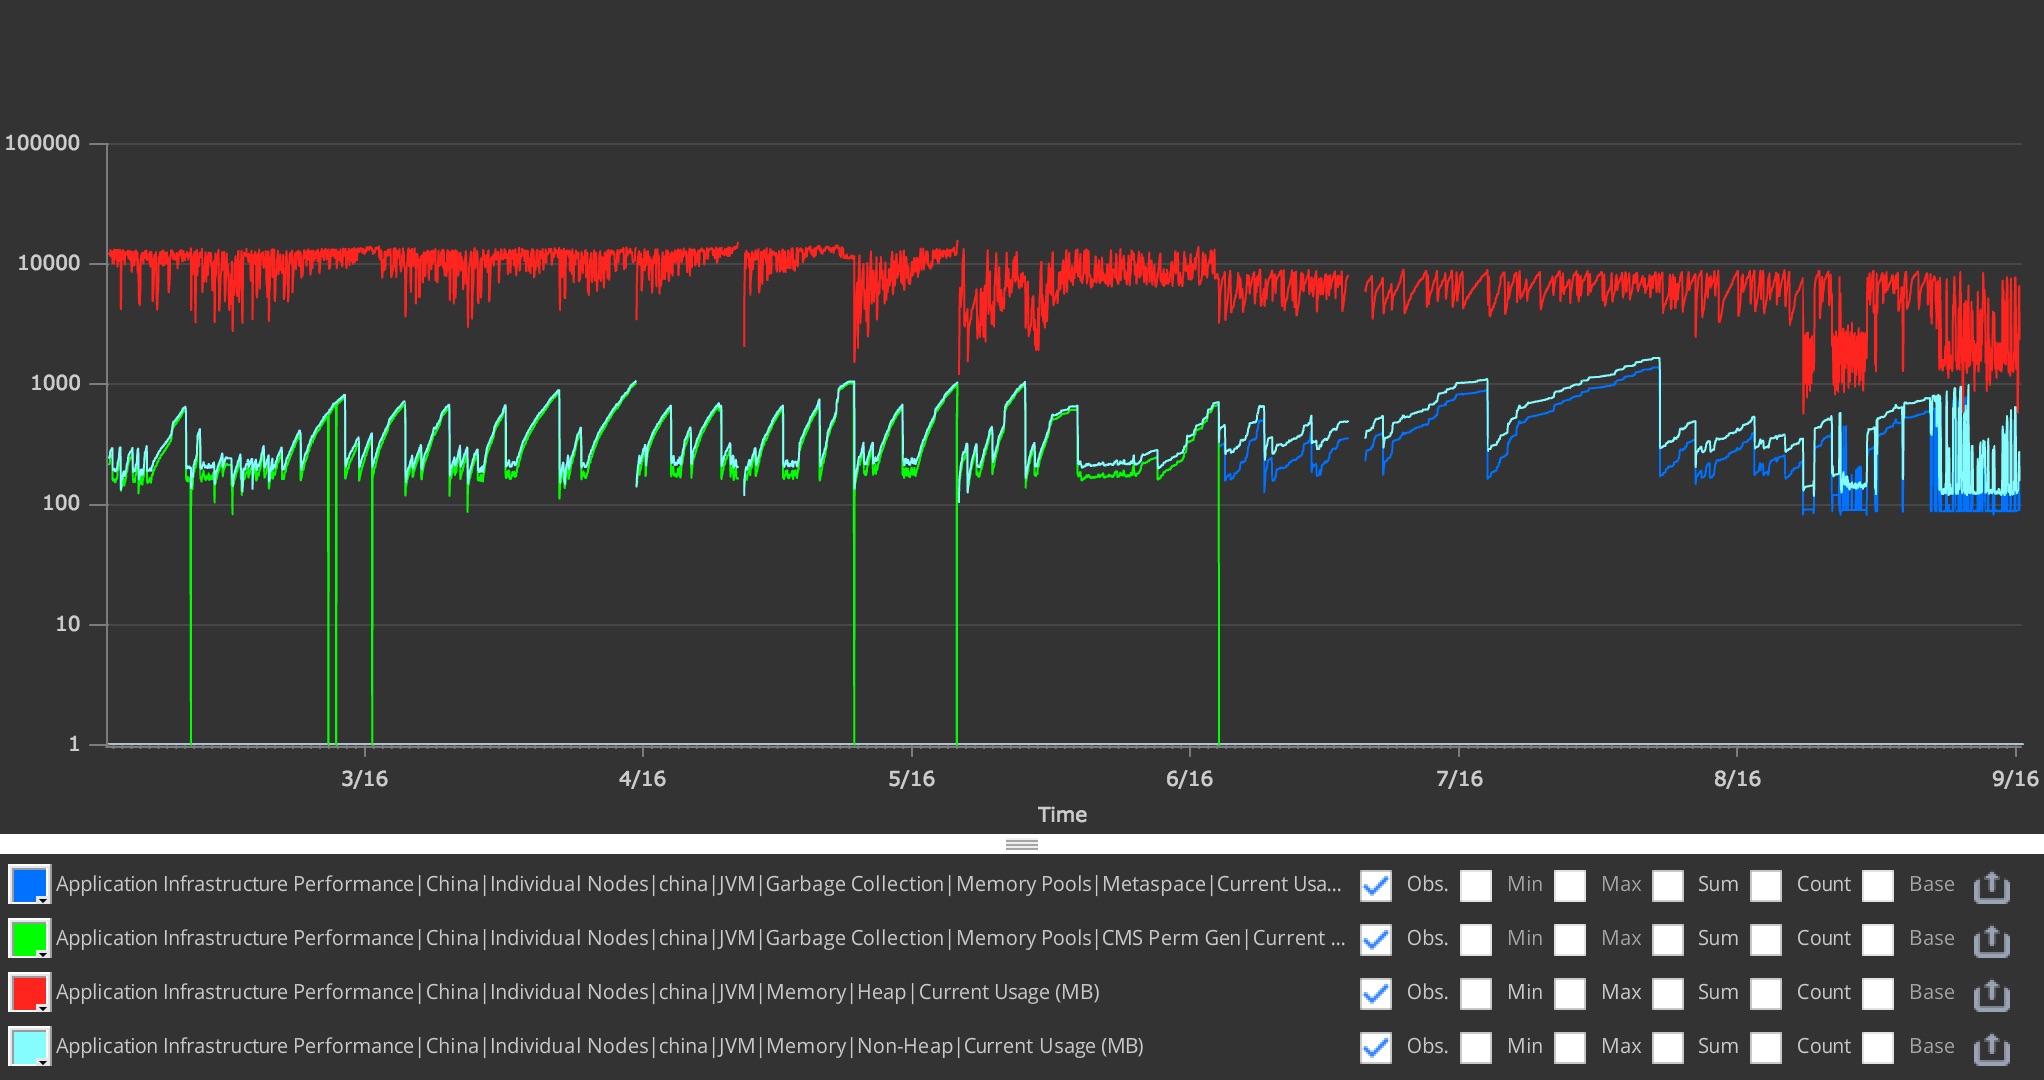
We switched in mid-June, where the green line ends. With Java 8, our instance runs at 60% heap utilization compared to Java 7. Those green lines down to 0 are restarts when we ran out of space in PermGen. With Java 8, we’ve had 0 restarts due to memory issues.
Sounded great to me, except for the fact that JDK8 isn’t in the default repositories for Ubuntu 14.04. Thereby leaving me with a couple options:
- Perform a system upgrade to Ubuntu 16.04 LTS
- Add a third party repository, e.g. a PPA.
- ???
After further discussion with Dean, he mentioned that they have actually been running a containerized Jenkins master without issues for a number of months.
Upgrading from dpkg to Docker
The Jenkins project uses the puppet-jenkins module for managing our Jenkins clusters so the installation of the Jenkins master was previously very simple:
class { 'jenkins' :
  lts => true,
}
Unfortunately, the puppet-jenkins module doesn’t support configuring a master
via Docker (yet?), so the migration steps were as follows:
- Uninstall the package and scripts
- Ensure Docker is installed
- Ensure the
jenkinsDocker container is running with the appropriate parameters, and the appropriate data volume.
Uninstall the package
The jenkins class resource declaration had to change a bit:
class { 'jenkins':
  version        => absent, # ensure our package is absent
  repo           => false,  # tell puppet-jenkins not to manage our apt repo
  service_enable => false,  # disable the Service[jenkins] resource
  service_ensure => stopped,# stop the old Service[jenkins]
}
Just to be safe the init.d script had to go too:
file { '/etc/init.d/jenkins' :
  ensure => absent,
}
This is enough to purge the Jenkins package/application from the system,
without actually removing your JENKINS_HOME (typically /var/lib/jenkins)
where all the data for the master is stored.
Ensure Docker is installed
I generally rely on Gareth Rushgrove’s docker Puppet module in any infrastructure I manage. I find it generally does a good job abstracting away the ugly parts of managing containers ina Puppetized infrastructure while still giving me the flexibility to get at raw Docker commands/flags when necessary.
Our Docker installation is fairly straight-forward:
class { 'docker' :
  manage_kernel    => false, # I prefer to do this myself thank you
  # Docker on Ubuntu defaults to devicemapper for its storage
  # which has issues which will affect your stability
  extra_parameters => '--storage-driver=aufs',
  # Ubuntu 14.04 LTS doesn't have the aufs kernel driver by default :(
  require          => Package['linux-image-extra'],
}

package { 'linux-image-extra' :
  ensure => present,
  # Make sure we get the package which matches our
  # specific installed kernel
  name   => "linux-image-extra-${::kernelrelease}",
}

firewall { '010 allow inter-container traffic' :
  iniface => 'docker0',
  action  => 'accept',
}
Ensure Jenkins is running in Docker
Using Gareth’s module, actually running Docker containers is very simple,
using the docker::run resource:
docker::run { 'jenkins' :
  # Pull the latest official `jenkins` container from
  # hub.docker.com
  image => 'jenkins',

  # This is a "clever" hack to force the init script to pass
  # the numeric UID through on `docker run`.
  # Since passing the string 'jenkins' doesn't
  # actually map the UIDs properly.
  extra_parameters => '-u `id -u jenkins`:`id -g jenkins`',

  # Ensure our HTTP and JNLP ports are open from
  # the container to the host (for reverse proxying in Apache, etc)
  ports            => ['8080:8080', '50000:50000'],

  # Map our existing volume `/var/lib/jenkins` into the
  # container's expected JENKINS_HOME path
  volumes          => ['/var/lib/jenkins:/var/jenkins_home'],

  pull_on_start    => true,

  # Make sure the other resoures we need for mapping users
  # and volumes are present before we attempt to set up
  # the docker::run resource
  require          => [
         File['/var/lib/jenkins'],
         User['jenkins'],
  ],
}
Mapping users and volumes
The Jenkins Docker image does come with a jenkins user pre-baked, but if
you’re upgrading from an existing dpkg or rpm install, you will already
have a jenkins user on the system and an existing JENKINS_HOME (e.g.
/var/lib/jenkins). Unfortunately this requires some hacks to “get right.”
Note the extra_parameters above. Simply telling Docker -u jenkins isn’t
enough to map the user ID into the container, which will result in “Permission
denied” errors when the container attempts to write to the data volume
(/var/lib/jenkins). Instead we must map the numeric UID and GID (user and
group ID) into the container for the file access control and ownership to
function properly.
Since Jenkins stores all its data under JENKINS_HOME, these additional,
minor, hacks in place the container will start up with the existing
JENKINS_HOME and everything will just work.
Staying up to date
The real powerful bits are hidden away in the Jenkins Docker
image, which uses the latest Jenkins LTS
release and the latest official OpenJDK 8 base image. For a systems
administrator, this means running docker run jenkins gets you the latest
JDK8 runtime, and the latest supported LTS Jenkins release, all in one tidy
little(-ish) container.
So long as my system can sanely run Docker containers, I can have frequent updates to keep my Jenkins in tippy-top shape.
Finale
After gratuitous testing in a staging environment, my drop-in replacement of
our existing dpkg-based Jenkins installation went like this:
- On the node:
puppet agent --disable - Deploy new Puppet code to Puppet master
- Prepare Jenkins for shutdown (basically put the build queue into read-only mode)
- On the node:
puppet agent --enable && puppet agent --verbose
From the outside looking in, there wasn’t any noticable change except that the Jenkins service restarted, like with a normal dpkg-based upgrade.
Despite some of my grumpiness about Docker’s seemingly endless amount of hype, I have actually been running it in production for over two years now. If you’re aware of its limitations and its benefits, it can dramatically simplify aspects of your infrastructure.
If your existing Jenkins master is running Linux, I strongly recommend dropping in a containerized Jenkins!